For the past 7 years, I have been running an old copy of Tibco EMS on my laptop, and I've been using this whenever I need to do some prototyping and development of new message-based apps. But in these cost-conscious times, many of my clients are looking for low-cost solutions. So, time to seriously consider RabbitMQ.
This is a quick guide that I wrote to get RabbitMQ up and running on a local PC in preparation for some .NET development.
Download the RabbitMQ Bits
1) RabbitMQ requires the Erlang runtime. You can download the Erlang/OTP runtime from http://www.erlang.org/
2) Download rabbitmq-server-2.6.1.exe for Windows from the RabbitMQ site, http://www.rabbitmq.com/
2a) Install RabbitMQ. It will install a Windows Service and will automatically start it.
2b) From the Windows Start Menu, run services.msc and verify that the RabbitMQ service has started.
3) All of the .NET download for RabbitMQ are located at http://www.rabbitmq.com/
3a) Download the .NET 3.0 version of the RabbitMQ client libraries and samples. The file is called rabbitmq-dotnet-client-2.6.1-
3b) Extract the ZIP file to C:\Program Files\RabbitMQDotNetClient (you can pick any location that you want).
3c) In C:\Program Files\RabbitMQDotNetClient\
4) From the Windows Start Menu, go to the RabbitMQ Server item, and then run RabbitMQ Command Prompt
4a) rabbitmqctl.bat is the command-line utility that lets you control RabbitMQ and list various objects. A sample command to list the RabbitMQ exchanges is
5) Download and install the RabbitMQ management plugins from http://www.rabbitmq.com/
5a) Download all of the EZ files associated with rabbitmq_management_visualiser
5b) Drop these files into the RabbitMQ Server\plugins directory, which on my system is C:\Program Files (x86)\RabbitMQ Server\rabbitmq_server-2.6.1\
5c) Restart the RabbitMQ server. You can do this through the Services.msc applet on your Windows machine.
Test It Out Using the Management Console
Now we will test out RabbitMQ by sending a message into an exchange and have a wildcard subscriber read that message.
6) As a test of the RabbitMQ management console, try this URL in your browser:
http://localhost:55672/mgmt/
Use the user id "guest" and password "guest"
7) Go to the Exchange tab and add a new exchange called CalcExchange that is non-durable (transient) topic. Fill in the name, type and durability as follows:
Name: CalcExchange
Type: topic
Durability: Transient
8) Go to the Queues tab and add a new durable queue called Calc.Queue.1
9) Stay in the Queues tab. In the table of queues, click on Calc.Queue.1
9a) Add a binding. In the Exchange and Routing Key fields, add the following:
Exchange: CalcExchange
Routing Key: Calc.Data.*.1
This binds any messages that have the routing key Calc.Data.*.1 to the Calc.Queue.1 message queue. So, if you publish a message with the key Calc.Data.Foobaz.1, it will be routed to this queue, where the subscriber will pick up the message for processing.
Now we will try to send a sample message using the management console.
10) Go back to the Exchanges tab and click on the CalcExchange item
10a) Go down to the Publish Message section.
10b) Type in the following entries for the Routing Key and Payload fields:
Routing Key: Calc.Data.ABC123.1,
Payload: This is a test message for Calc Node 1
10c) Press the Publish button. When the status message pops up, just close it. The status message should have a green background, indicating success.
11) Go back to the Queues tab, and click on Calc.Queue.1
11a) Go down to the Get Messages section and press the "Get Message(s)" button. You should see the message that you just sent.
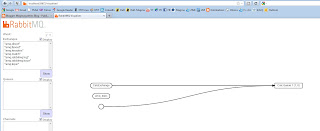
12) You can also go to the last tab of the management page, which should be the Visualizer tab, and view the topology.
As an aside, the sample programs that come with the .NET Client need a bunch of mods before you can get them to load into Visual Studio 2010.
©2011 Marc Adler - All Rights Reserved. All opinions here are personal, and have no relation to my employer.
This is a quick guide that I wrote to get RabbitMQ up and running on a local PC in preparation for some .NET development.
Download the RabbitMQ Bits
1) RabbitMQ requires the Erlang runtime. You can download the Erlang/OTP runtime from http://www.erlang.org/
2) Download rabbitmq-server-2.6.1.exe for Windows from the RabbitMQ site, http://www.rabbitmq.com/
2a) Install RabbitMQ. It will install a Windows Service and will automatically start it.
2b) From the Windows Start Menu, run services.msc and verify that the RabbitMQ service has started.
3) All of the .NET download for RabbitMQ are located at http://www.rabbitmq.com/
3a) Download the .NET 3.0 version of the RabbitMQ client libraries and samples. The file is called rabbitmq-dotnet-client-2.6.1-
3b) Extract the ZIP file to C:\Program Files\RabbitMQDotNetClient (you can pick any location that you want).
3c) In C:\Program Files\RabbitMQDotNetClient\
4) From the Windows Start Menu, go to the RabbitMQ Server item, and then run RabbitMQ Command Prompt
4a) rabbitmqctl.bat is the command-line utility that lets you control RabbitMQ and list various objects. A sample command to list the RabbitMQ exchanges is
rabbitmqctl list_exchanges
However, we will use the management console, not the command line.5) Download and install the RabbitMQ management plugins from http://www.rabbitmq.com/
5a) Download all of the EZ files associated with rabbitmq_management_visualiser
5b) Drop these files into the RabbitMQ Server\plugins directory, which on my system is C:\Program Files (x86)\RabbitMQ Server\rabbitmq_server-2.6.1\
5c) Restart the RabbitMQ server. You can do this through the Services.msc applet on your Windows machine.
Test It Out Using the Management Console
Now we will test out RabbitMQ by sending a message into an exchange and have a wildcard subscriber read that message.
6) As a test of the RabbitMQ management console, try this URL in your browser:
http://localhost:55672/mgmt/
Use the user id "guest" and password "guest"
7) Go to the Exchange tab and add a new exchange called CalcExchange that is non-durable (transient) topic. Fill in the name, type and durability as follows:
Name: CalcExchange
Type: topic
Durability: Transient
8) Go to the Queues tab and add a new durable queue called Calc.Queue.1
9) Stay in the Queues tab. In the table of queues, click on Calc.Queue.1
9a) Add a binding. In the Exchange and Routing Key fields, add the following:
Exchange: CalcExchange
Routing Key: Calc.Data.*.1
This binds any messages that have the routing key Calc.Data.*.1 to the Calc.Queue.1 message queue. So, if you publish a message with the key Calc.Data.Foobaz.1, it will be routed to this queue, where the subscriber will pick up the message for processing.
Now we will try to send a sample message using the management console.
10) Go back to the Exchanges tab and click on the CalcExchange item
10a) Go down to the Publish Message section.
10b) Type in the following entries for the Routing Key and Payload fields:
Routing Key: Calc.Data.ABC123.1,
Payload: This is a test message for Calc Node 1
10c) Press the Publish button. When the status message pops up, just close it. The status message should have a green background, indicating success.
11) Go back to the Queues tab, and click on Calc.Queue.1
11a) Go down to the Get Messages section and press the "Get Message(s)" button. You should see the message that you just sent.
12) You can also go to the last tab of the management page, which should be the Visualizer tab, and view the topology.

As an aside, the sample programs that come with the .NET Client need a bunch of mods before you can get them to load into Visual Studio 2010.
©2011 Marc Adler - All Rights Reserved. All opinions here are personal, and have no relation to my employer.

No comments:
Post a Comment